Green Cat Stair Project
|


posted by
Elifce at 13:53
>3 comments
![]()
| e-craft.blogspot.com |
This page is dedicated to handmade bracelets, necklaces, rings and earrings of Elifce collections. It consists of Anatolian culture. Best wishes from ISTANBUL to all world...
Welcome to my craft world. Thanks to my husband and son :)
|
|

|
posted by
Elifce at 13:53
>3 comments
![]()
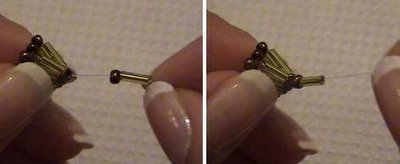
I saw that you guys were asking me about the Osmanli Jewellery so I decided to show you on this video clip(it' s in Turkish). The part that I am going to show you how to do is the chain part of the necklace, that was the part that you were all curious about. 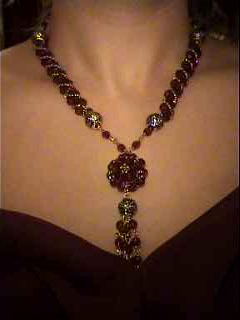 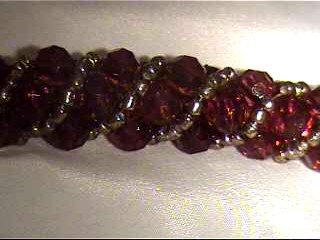 The materials that you will need are crystal beads(which are the bigger round beads),some of the smaller beads as you can see in the video, and of course the fishline for the string of the necklace.If you have a fishline that is a little bit thicker that would work better. I am going to show you a small part of it and when you are making it, you can adjust it to your own neck. Take one of the small beads and ut the fishingline through it,then the bigger bead called the crysal bead.Then,add 3 more of the smaller beads. Tilt the fishing line to the left and once the beads are to the left side tie the shorter part of the string up because you are going to end up burning that part anyways because it isn't needed.Tie 2 knots to make sure that it is really secure in place. Then,you add 3 of the smaller beads again and then add the crystal bead.Then put the first line of string that you made through the last one that you have done as shown on the video.Then add 3 more of the small beads and then again the crystal bead.It will always be 3 small and one crystal ,you will do this process through out the whole thing. Once again you put the new line of string that you made through the last one that was made. In this step you will repeat the last step because it is practically the same step like I mentioned, it is the same process through out the whole necklace. As you can see once you repeat this step a few times, you will see the pattern and shape that we are trying to achieve. You will see the necklace developing as you go on. I would like to thank you all very much and I hope this video helped you guys up a bit. In the future I would like to show you more examples of the jewellery and handcrafts that I make so check the website regularly and send me comments or questions that you have and I will help you out as much as I can. _ Part1 Part2 _ Part3 _ Part4 _ Part5 |
posted by
Elifce at 13:51
>1 comments
![]()
| Knitting Project-2... In our culture this type of knitting is called as "Topukane". (Video is in Turkish) |
posted by
Elifce at 22:57
>2 comments
![]()
| Pyramit Beadwork... Mrs. Gundogan' s Pyramit Beadwork. Video is in Turkish, but I am sure you can clearly understand the patterns by watching it. Thanks to Mrs. Gundogan :) 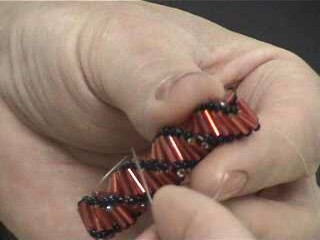 Part 1: Part 2: |
posted by
Elifce at 02:27
>3 comments
![]()
